
First Print
Source: X2D 3D Printing User Manual · v1.0 · 2026.05 · p. 22–30
Before the first print, you need to ensure the printer is properly placed, installed, and auto-calibrated. This chapter guides you through these preparations to ensure the printer starts its first print in optimal condition.
2.1 Preparation Before Printing
2.1.1 Printer Placement
Keep the workspace clean and tidy to ensure print quality and equipment safety. Place the printer on a level, sturdy platform.
2.1.2 Initial Installation
Please follow the steps below to install the printer:
-
Remove packaging materials. Follow the Quick Start Guide to remove the outer box, foam, moisture-proof bag, and internal fixtures, ensuring no packaging materials are left on or inside the printer.
-
Check the printer and accessories.
- Confirm that all included accessories are present.
- Ensure the printer’s standard textured PEI plate is correctly installed on the heatbed.
-
Install accessories. Ensure the touchscreen, auxiliary extruder, external exhaust fan bundle, external spool, and AMS 2 Pro (if any) are properly installed. If not, you can follow the steps in the video below.
Scan the QR code or click the link (wiki.bambulab.com/general/unboxing-guide) to watch the unboxing video and jump to the relevant time segment as needed.
-
Check power-on status.
- Ensure the power cord is properly connected.
- Confirm that the power switch on the back of the printer is turned on and the indicator light is lit.
- The touchscreen should light up normally and display the initial setup interface.
2.1.3 Initial Calibration
On first startup, the printer will automatically enter the initialization process. Follow the on-screen instructions to complete the steps:
- Language, region, and network settings. Select the appropriate language and time zone, then choose an available Wi-Fi network, with the option to skip network selection if it is not required.
- Account login. Open Bambu Handy and scan the QR code displayed on the touchscreen to bind the printer (see Install Bambu Handy). You can skip this step if it is not required.
- Automatic calibration. The printer will automatically perform a series of operations, including motor noise cancellation, vibration compensation, auto bed leveling, and nozzle offset calibration.
- Remove the foam under the heatbed. The heatbed rises after the calibration. Remove the remaining foam from the bottom area.
- Calibration completes. The touchscreen displays “Calibration completed”, and you can start your first print.
2.2 Load Filament
2.2.1 Load Filament via AMS 2 Pro
-
Place the spool into any AMS 2 Pro slot. Gently push the feeder tab and insert the filament. The AMS 2 Pro will detect the filament and load it automatically.
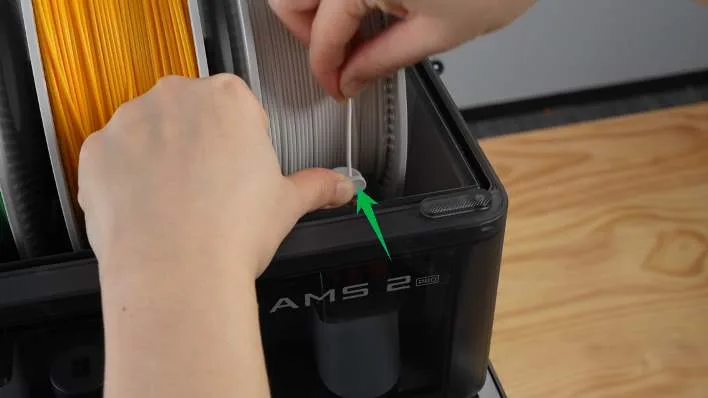
Insert the filament into an AMS 2 Pro slot and push the feeder tab. -
After confirming the spool rotates smoothly, close the AMS 2 Pro cover and secure the locking tab.
-
On the printer screen homepage, navigate from the assistant to the AMS Setup page.
-
Select Auto Mode › Detect. The printer will automatically detect which extruder the AMS 2 Pro is connected to.
2.2.2 Load Filament via External Spool
-
After confirming the filament type and color, place the spool on the spool holder according to the filament winding direction.
-
On the printer screen, tap the filament icon › external spool › edit, select the filament type and color, then tap confirm.
-
Insert the filament into the PTFE tube and push forward until it stops. The line between the toolhead and spool on the printer screen will show the filament color, indicating the extruder has detected filament entry.
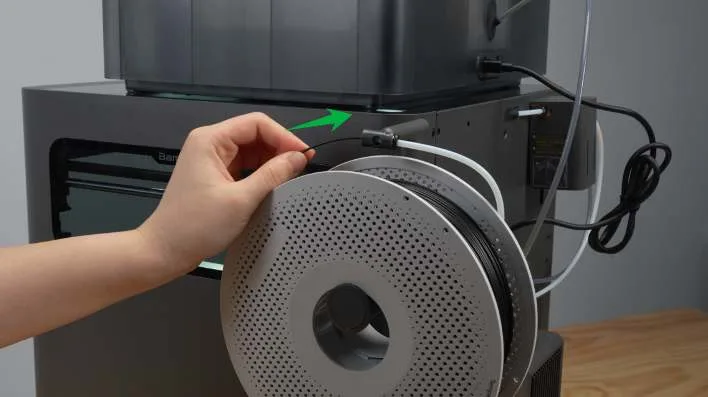
Insert the filament into the PTFE tube and push forward until it stops. -
On the screen, tap external spool (Ext) › Load, then wait for the nozzle to heat up.
-
Follow the on-screen prompts to check if the filament extrudes smoothly from the nozzle. Then select the corresponding option on the touchscreen.
2.3 Start Printing
The printer includes pre-sliced files for common models such as the scraper handle, ready to print from the screen. You can also start prints from a mobile device using Bambu Handy or from a computer using Bambu Studio. See Printing from Multiple Devices.
-
On the touchscreen, tap the home icon › Print Files and select the model you want to print.
-
Select the filament for both hotends, then tap Print.
2.4 Remove the Model
-
Wait for the heatbed and model to cool down. After printing is complete, wait for the heatbed to cool to room temperature before removing the build plate, model, and other print structures. This prevents model deformation, build plate damage, or hand burns.
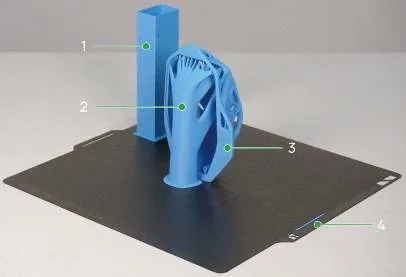
Print structures: 1. Prime tower · 2. Support · 3. Model body · 4. Prime line. -
Remove the model. Pinch the edge of the build plate and lift up, then take out the detached model. If the model adheres firmly to the build plate, gently flex it to release the model or use a scraper to assist removal.
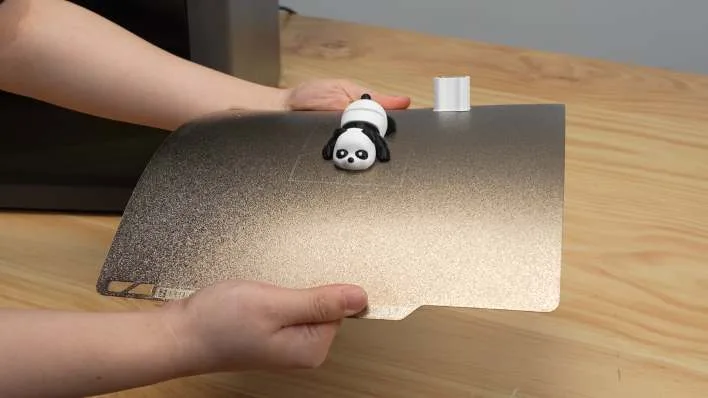
Pinch the edge of the build plate and flex it to release the model. -
Clean the build plate. Remove the prime tower and scrape off the prime line. Place the build plate back, ensuring it aligns with the heatbed’s stopper.
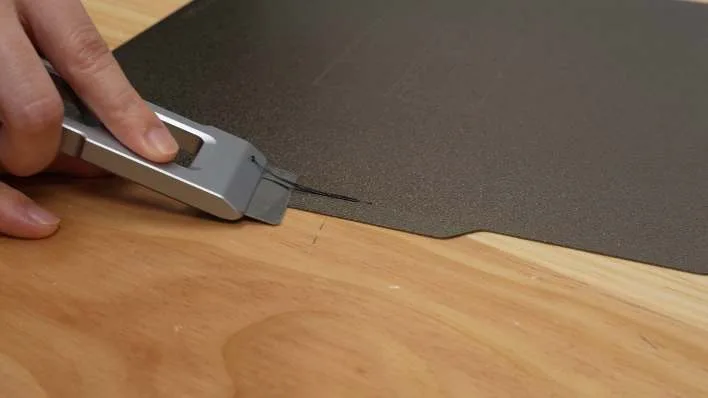
Scrape off the prime line and place the build plate back. -
Model post-processing (if necessary). For models with support structures, remove the supports promptly after printing. Use your hands or needle-nose pliers to break them off from the model body.
2.5 Unload Filament
2.5.1 Unload Filament from AMS 2 Pro
After the print job completes, the filament will automatically retract into the AMS 2 Pro.
If you need to unload filament after stopping or canceling a print job, go to the filament icon on the printer screen, select the corresponding filament icon, and tap Unload to return the filament to AMS 2 Pro.
2.5.2 Unload Filament from External Spool
- On the printer screen, go to the filament page, select external spool, then tap Unload.
- When the filament exits the extruder, follow the printer prompts to rewind the filament, then insert the filament end into the spool’s hole to secure it.
- On the screen, tap Finished, continue to complete Unload.
2.6 Waste Disposal
Waste refers to the excess filament extruded to clear residual filament inside the nozzle at the beginning or during multi-color, multi-material printing, to ensure print quality. This waste is expelled through the purge chute at the back of the printer.
We recommend following the steps below to collect and dispose of the waste:
- Use a container to catch the waste during printing and clear it regularly.
- Before printing, make sure there is no waste left inside the purge chute and the outlet is unobstructed.
- Avoid installing covers or pipes on the back of the printer that might block the purge chute to prevent clogging or print failure.
- Dispose of waste in accordance with the regulations of your country or region.
2.7 Connect Multiple AMS Units
Each hotend of the printer can connect up to 4 AMS/AMS 2 Pro units and 8 AMS HT units. With a dual hotend setup, you can print with up to 25 colors. Connecting 1 or 2 AMS devices requires no extra accessories. For 3 or more AMS devices, please purchase a Bambu 4-in-1 PTFE adapter.
Connection Steps:
-
Use the Bambu Bus cable 6-pin to connect all AMS devices and the printer as shown in the diagram.
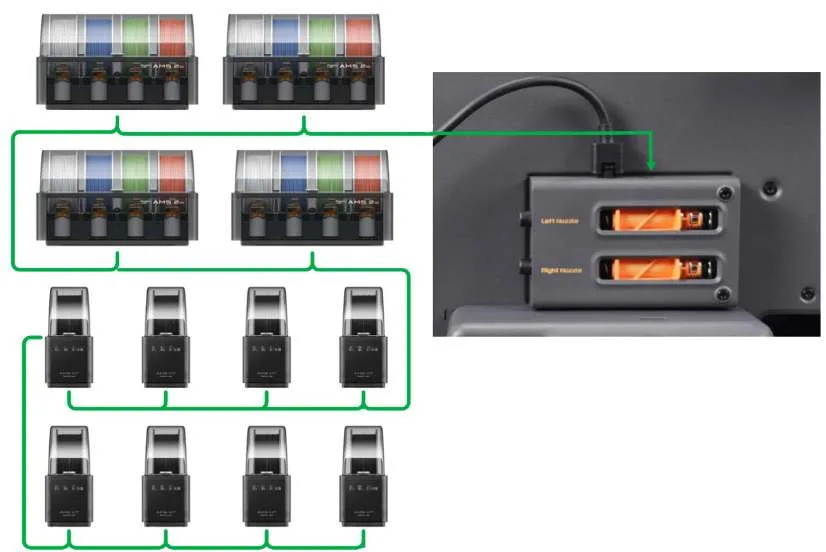
Step 1: Connect all AMS devices and the printer with the Bambu Bus cable 6-pin. -
Use the PTFE tube to connect AMS devices and the Bambu 4-in-1 PTFE adapter as shown in the diagram.
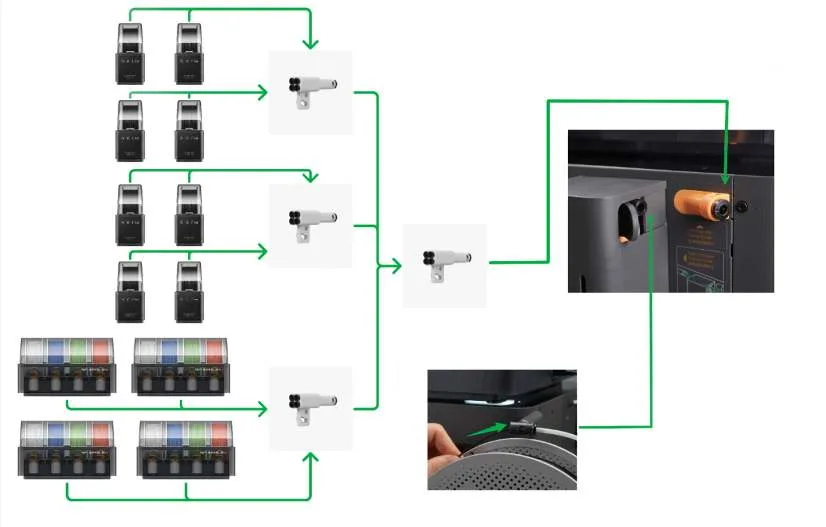
Step 2: Connect AMS devices and the Bambu 4-in-1 PTFE adapter with the PTFE tube.